Installing Scisoft 8 on Fedora 24

Scisoft 8 is built on Fedora 20 and it works flawlessly on higher versions of Fedora (currently the lasted is 24) as well. However, there are number of issues you may encounter during installation, even if installation completes you may find various components of Scisoft is broken.

Here I outline all the preliminary dependencies installation which are not resolved by dnf and few other compilation of required components. I intend to list step-by-step commands to execute, which even you blindly copy-paste and execute you will have a fully working installation of Scisoft. However the fundamental prerequisite to keep in mind, is to install Scisoft 8 you need a 64bit installation of Fedora.

Step 1: Update your Fedora

Step 2: Install ScientifiicPython, a prerequisite for Scisoft

ScientificPython is one of the main external dependency required by Scisoft and it involved RPM compilation and then installation.
However, before we begin compilation we require installation of few additional necessary components.

Now fetching source and  compilation

Then installing ScientificPython

Step 3: Some tricky parts to execute

Before we proceed further we have to do some tricky installation of few components.

This is tricky because all these components are automatically resolved by dnf, but we want to install them beforehand to avoid some specific issues, installation of these components at this stage only is absolute necessary. pyfits will otherwise overwrite the old component of libcfitsio which we will install next. redhat-rpm-config and libX11-devel are sometimes installed at later phase by dnf, which will cause broken installation of Astropy package and therefore failed pyraf.

Step 4: Libcfitsio library installation

Lets fetch and install this specific version.

Step 5: Disable Selinux

Although this is not absolute must but you want to do it to avoid potential conflicts afterwards and also no warning notice for Scisoft Iraf.

Edit selinux config

Modify enforcing to disabled

SELINUX=enforcing → SELINUX=disabled

System reboot

Step 6: Scisoft installation

Now we are ready to follow usual Scisoft installation procedure.

Add scisoft repository

Put this content in it

[scisoft]
name=Scisoft
baseurl=ftp://ftp.eso.org/scisoft/scisoft8/linux/fedora/20/x86_64
gpgcheck=0
enabled=1

Begin installation

This will take some time and good stable internet connection is required. Although some may suggest installation from separately downloaded RPMs, but I prefer repository installation.

Step 7: Post installation configuration (optional)

Now you are done with successful installation. This are some optional configuration you may want to do (or you may do in you preferred way), for easy access to Scisoft.

Edit your local .bashrc file and source Scisoft setup script (simply add this line)

Also create login.cl file, after opening new bash shell or restarting.


So, now you have fully running Scisoft on your new Fedora installation.

Comparing four best Remote Desktop software

compare-remote-desktop-sw

We shall be comparing among the four Remote Desktop software which we found to be best of it’s class. It is improper to say any of them to be the best; each one of these have merits and demerits of it’s own. Thus rather going into ranking these tools based on performance and features, we shall only list and compare features which makes each one of these better than the rest, we leave it to our readers to choose the one which best suit their needs.

In this comparison what we shall be looking for features, accessibility and, performance in top of priority.

radmin
1) Radmin: This is definitely not the most popular software in this class, but what makes it stand out in our analysis is it’s performance. Radmin works only in LAN or direct IP connection, it does not work with remote PCs behind a different network. If your preference is to work on remote PC connection through LAN, then this is the best option, the speed is superb and very smooth without any lags. It is very simple with minimal features, but yet it excels in the sole purpose of remote desktop tools, i.e., speedy and smooth remote access. While working for hours you shall forget that your are not sitting in front of your actual remote PC. It also has fully compatibility with multiple monitors of remote PC, even if the client PC has single monitor.

To mention the down sides of Radmin: 1) Only works on LAN, 2) audio is not transferred from remote PC, although its is partially supported on XP, but in a very odd way, 3) Only windows version is available, however the Viewer works in Linux using WINE, but that is not much appreciated, 4) Windows AERO themes are automatically disabled in remote PC, but this is one of the reason for it’s superb speed, 5) No option for blank screen and disabled input while working on remote PC, 6) There is no free version, it only offers a trial period.

teamviewer
2) TeamViewer: This is possibly the most popular Remote Control software and the reason is excellent set of features and offering free version for personal use with only a minor nag screen. The best part of the software is the ability to access remote PCs on entire different network over Internet. it also has a feature to explicitly connect over LAN without the need of registration for TeamViewer account or Internet. When computers connected over LAN the speed is reasonably good, but not as good as few other tools which are only specific for LAN. It has the ability to transfer remote sound and has full support for multiple monitors. it also offers feature to show blank screen and disable remote input while working. TeamViewer is supported on all popular OS version including Windows, Linux, iOS and Android.

The only downside is the speed and smoothness of remote access, although the speed is not not as bad as most other similar free alternatives, but on the same time it is not among the fastest ones.

Splashtop
3) Splashtop: They claim to be the fastest remote desktop tool. Our analysis shows that it is indeed very fast and smooth in HD video steaming with audio, in fact it fulfills it’s claim being the best, however while using it for regular purpose of remote computer access, it somewhat fails to catch-up with Radmin or other similar LAN specific tools in terms of smoothness. We found occasional lags in access when using it over LAN, where it is supposed to provide the best performance. We used only the free version and so we could not test for cross-network connection speed as only LAN connection is sported in free version. Splashtop too like TeamViewer supports multiple platforms including Android and iOS.

To mention the negative, the software is quite buggy or unfinished. Splashtop has many features, but many don’t work fully as supposed to be. It has a feature to disable remote display but it does not work always and has few limitations. The support for multiple monitors is there but there are several problem with resolution where each monitor has different screen resolution and some users also report few other similar problem with multiple monitors. Although connection on LAN (without internet) is supported but it doesn’t have explicit control over LAN connection, it works in quite weird way, at least for first time you have to connect using internet then next time onward it shall remember the remote computer with or without internet, but it does not give you full control to connect using IPs. This was supported in previous versions but  new versions has remove this feature.

remote-desktop
4) Windows Remote Desktop Connection: The greatest advantage of this is it’s default availability in Windows PC.  It comes pre-installed with Windows Professional and Ultimate versions. The reason why Windows Remote Desktop made it’s position in this list is fast and smooth remote access along with support for audio. It uses the  windows user login information to authenticate connections and is quite simple to setup but limited with very basic features. We tested and found that he speed is similar to Radmin with advantage of audio transfer from remote PC.

The downside is definitely lack of cross-platform compatibility as it only support Windows. Even all windows version does not have this tool, as Home Basic or Home Premium versions have only one way connectivity, i.e, they can connect to other Pro or Ultimate version Windows PCs, but they can not be connected. The RD connection uses the user login information and it always disables the remote screen and remote input which is not often suitable.

To conclude, if your Remote Desktop usage is very limited and your PCs are having supported windows versions, you may use Windows Remote Desktop Connection to avoid the hassle of third party software installation and acquiring licenses.
On the other hand if you are extreme users of remote desktop with speed being the priority and you are also willing to pay a few bucks then can go for Radmin, but again your usage will be limited to Windows only.
However if you want a free feature rich alternative with cross-network and cross-platform connection advantage with some minor compromise with speed then TeamView is for you.
Splashtop seems to have a promising future and HD streaming or remote presentations are your priority then give it a try.

Remove yellow background of Adsense Ads in WordPress

rem-ad-yellow-bkgndHave you encountered pale yellow background in Adsense or other advertising units plates in WordPress?

Then probable you must be using latest WP themes like Twenty-Fourteen. Well, the problem is not at all with ad-units., the actual culprit is the WP themes (Twenty-Ten, Eleven… Fourteen etc.). The color is defined in CSS tag ins of these themes. The solution is also pretty  simple. Search for the following lines

inside the theme style file

wp-content/themes/twentyfourteen/style.css

and replace with

That’s all, you are done! Now you have transparent background to all ad-units.

In continuation to this I would recommend not to edit the original theme files rather make a child theme and add the modified CSS ins definition there only. This shall prevent any overwriting in case of any future update of these themes.

Testing RAM with Windows Memory Diagnostics tool

diagnose-ram

RAM sticks are often consider as prime culprit behind random and creepy system failures. There exist a number third party fancy memory testing tools with extensive list of features. However a inbuilt ready to use RAM diagnostic tool also exist in all Windows PC, which is simple and yet powerful enough to do the memory test.

Here’s the three step guide with screenshots:
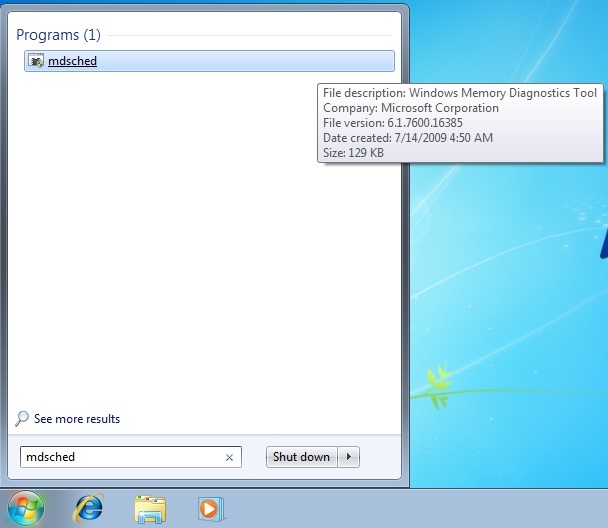
Step 1: Open Start Menu and type in Search / Run box mdsched.exe, pres enter.
run-mdsched

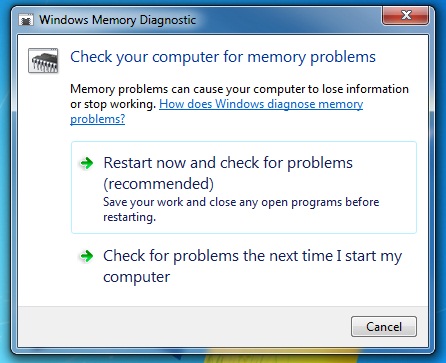
Step 2: A window will open asking to restart computer and start the test or to schedule a test on next manual restart. Click on ‘Restart now and check for problems’ to run test immediately.
mdsched-dialog

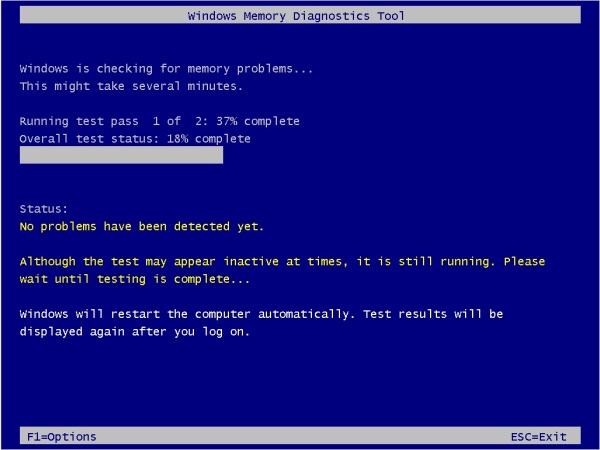
Step 3: The test screen will appear showing the test progress and the number of passes on the RAM. If any error is found in memory test it will shown on screen
test-screen

After completion of test it will automatically restart windows and after awhile it will show a notification balloon in task bar showing the status of test, if no error is found then the notification balloon would say ‘No errors were detected’
ram-test-reult

So, if RAM is fine then you need to look into  other hardware or software problem source.